Easy Kimchi Recipe
Jump to Recipe


My Korean Kimchi Recipe is easy to make, tastes amazing and uses the traditional fermentation process that produces good bacteria through lacto fermentation.

Baechu (Napa Cabbage) Kimchi is a traditional Korean condiment that’s served with most meals like fried rice, soup, noodles, dumplings and stir fry. Many people also eat it as a side dish.
The main ingredient in this recipe, which just happens to be the national dish of Korea, is fermented cabbage. Combined with other ingredients like Daikon radish, green onions and Gochugaru chili paste, it provides the perfect balance of spice and flavor that my whole family loves.
Not only is it more affordable to make your own, but the flavor of homemade kimchi is so much better than anything you can buy at the grocery store. You’ll find yourself experimenting with all of the different ways to eat this traditional Korean side dish.
Kimchi Ingredients
- 1 head of Napa cabbage
- ¼ cup of sea salt
- Filtered water
- ½ pound of peeled daikon radish
- 6 green onions
Kimchi Paste Ingredients
- 3 tablespoons of minced garlic
- 1 tablespoon of grated ginger
- 1 teaspoon of granulated sugar
- ¼ cup of filtered water
- 1 tablespoon of Korean fish sauce
- 3 tablespoons of Korean Gochugaru Red Pepper Flakes
Equipment
- Knife
- Cutting Board
- Large bowl
- Small bowl
- Spoon or whisk
- Plates or other weights
- Gloves
- Measuring cups and spoons
- Mason jars
Step-by-Step: How to Make Easy Kimchi
Follow these simple steps to learn how to make your own mak (easy) kimchi that tastes as authentic as your favorite Korean restaurant.
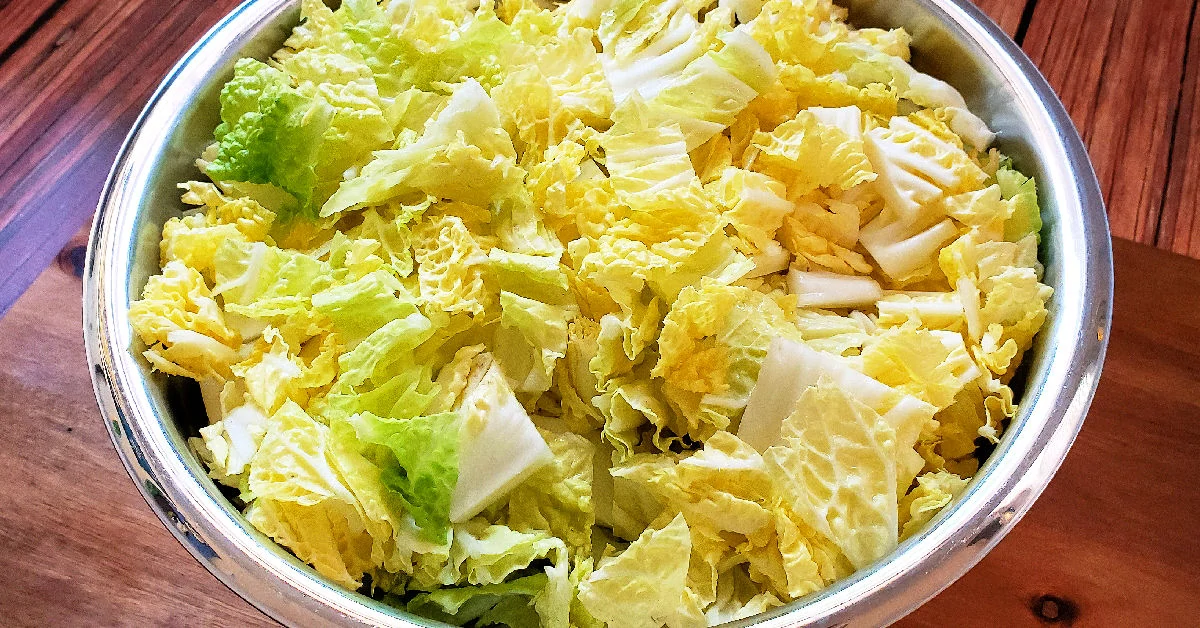
Step 1: Chop Napa Cabbage.
Quarter one large Napa cabbage lengthwise, then remove the thick core. Slice each quarter into 2-inch-wide strips (or bite-sized pieces, depending on your preference). Place the chopped Napa cabbage leaves into a big bowl.
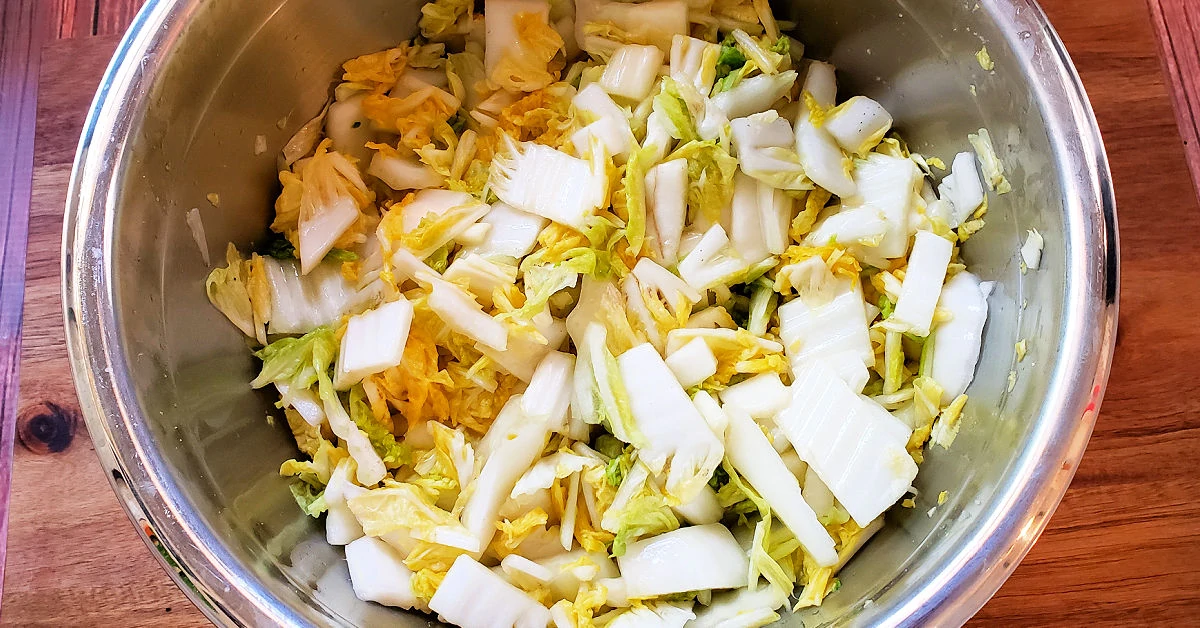
Step 2: Salt Napa Cabbage.
Sprinkle ¼ cup of sea salt over the Napa cabbage. Massage it into the chopped leaves until they begin to soften. The leaves will shrink down quite a bit.
Don’t worry… you won’t lose the crisp texture of cabbage. The white parts of Napa cabbage really hold their crisp during the fermentation process compared to some other types of cabbage.
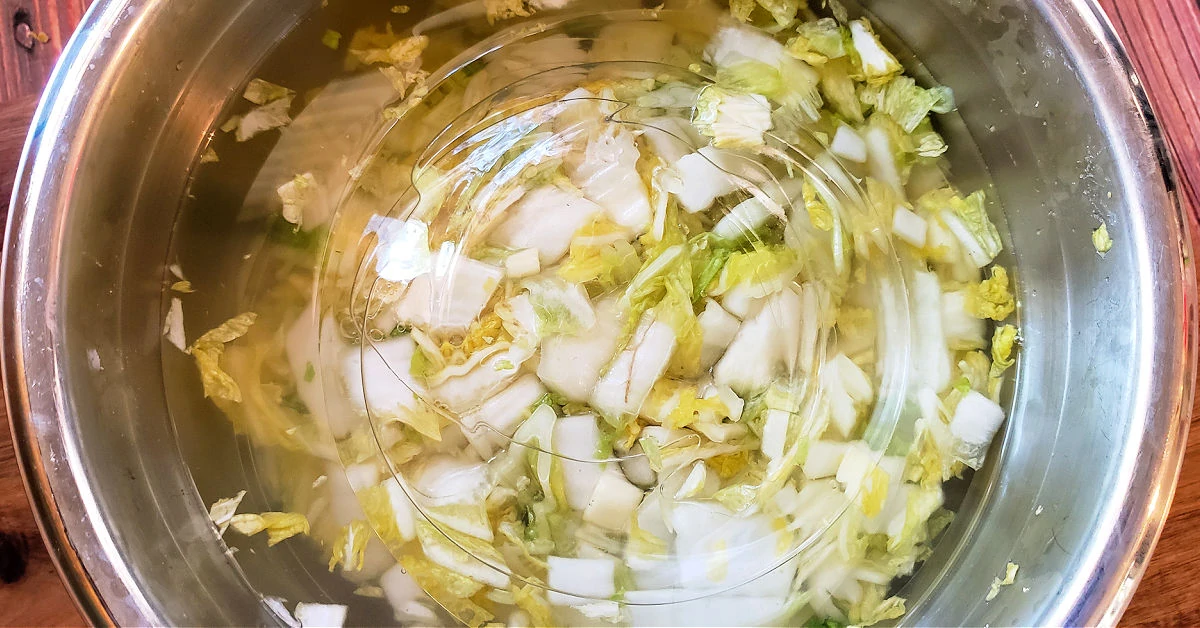
Step 3: Soak Cabbage in Water then Strain.
Once it starts softening, add just enough filtered water to cover the cabbage. Place something like a plate on top of the cabbage to weigh it down. All of the cabbage needs to stay under the water, so make sure it’s weighed down well. Let the Napa cabbage soak in the saltwater for about 6 hours.
After the 6 hours is up, place a fine-mesh strainer over a large mixing bowl. Pour the cabbage into the strainer and allow all of the water to drain into the bowl. Reserve the liquid (save it).
Step 4: Make Gochugaru Chili Paste.
In a small bowl, combine 1 tablespoon of grated ginger, 3 tablespoons of minced garlic, 1 teaspoon of granulated sugar, 1 tablespoon of fish sauce, ¼ cup of filtered water and 3 tablespoons of Gochugaru pepper (see tips below for adjusting spiciness level). Stir until a chili paste forms.

You can leave the garlic a bit chunkier as we like it, or you can make a smooth paste by using an immersion blender or running the Gochugaru mixture through a food processor.
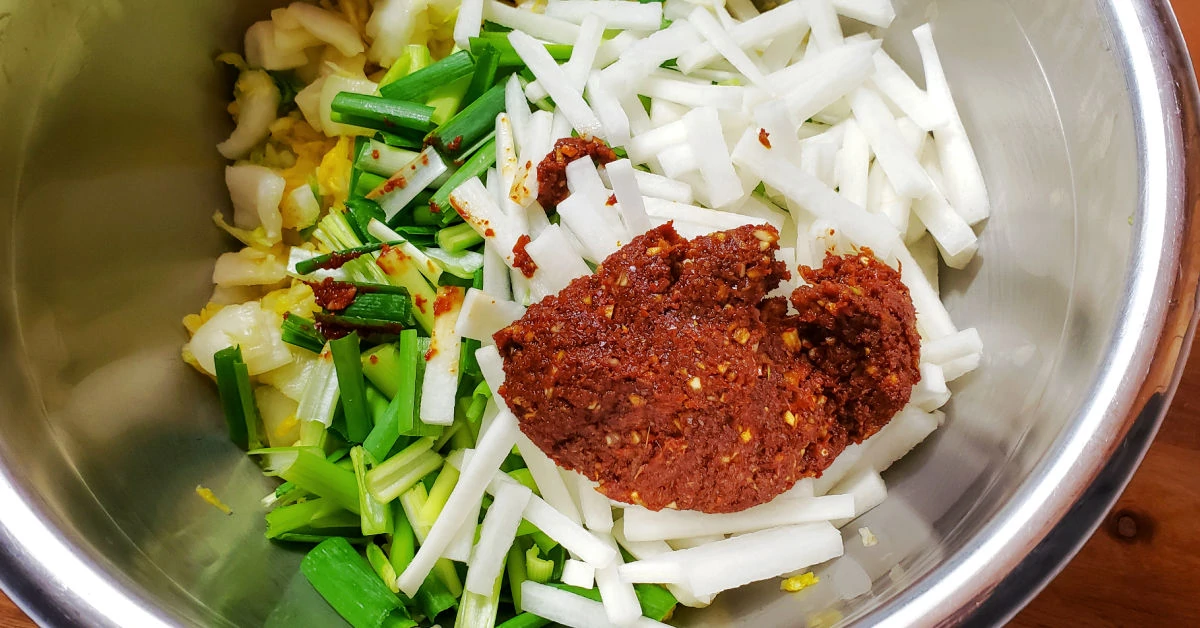
Step 5: Combine Veggies and Chili Paste.
Place the strained cabbage into a large mixing bowl. Peel and chop your Daikon radish into small matchsticks and add to the bowl. Cut 6 green onions in half lengthwise, then into 1-inch pieces and add to the bowl. Then add the chili paste you made to the bowl.
Step 6: Massage Chili Paste Into Veggies.
Carefully massage the Kimchi paste into the vegetables until everything is evenly coated. I highly recommend wearing food prep gloves as the Korean red pepper powder can sting quite a bit.

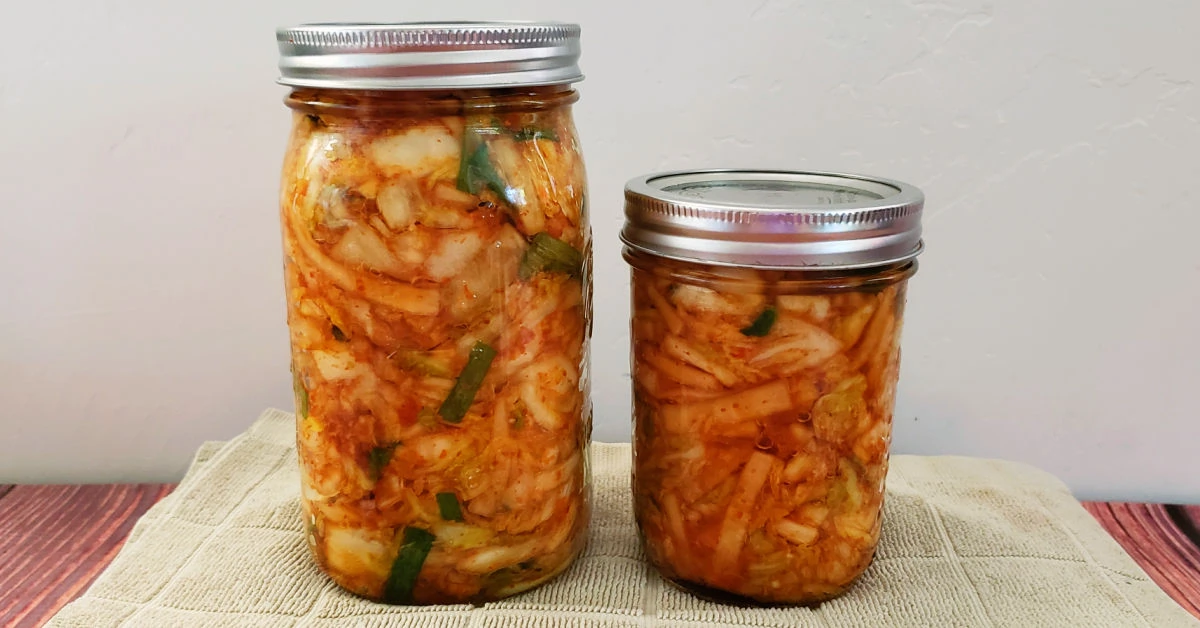
Step 7: Pack Kimchi Into Jars.
Once the veggies are evenly coated with the paste, transfer the mixture into mason jars. You really want to pack it in there, so press down on it really well to make sure there are no air pockets.
There will be some brine in the jar, but you’ll likely need to top it off with the brine you collected in the mixing bowl when you strained your cabbage. Make sure everything is submerged under the brine. If it doesn’t want to stay submerged, you can use a larger piece of a cabbage leaf to hold everything down.
Leave at least an inch of headspace (it will expand a lot during the fermentation process) and lightly seal your mason jar with a lid and ring. Screw the band on tight enough to where it’s sealed, but some air can escape. If you screw the lid on too tightly, it will be really hard to open when pressure builds up.

Step 9: Allow Kimchi to Ferment.
Place your jar in a dark place (out of direct sunlight) on top of a towel (one you don’t mind getting stained) or in a baking pan and let it sit for 2-6 days at room temperature. You’ll start to see air bubbles in the mason jar and some of the brine may escape (which is why you want the towel or pan there to catch it).
Each day, open the jar two to three times to release built-up pressure and taste your kimchi. The longer you let it ferment, the more often you’ll want to check it through the day. If it’s done, you’ll transfer it to the fridge. If it’s not, you’ll allow it to continue fermenting. It’s better to put it in the fridge too soon rather than too late. Over fermented kimchi does not have the best flavor.
Please Note: The kimchi may expand significantly when you open the jar, so you’ll want to press it back down under the brine before re-sealing your mason jar. Do this with a gloved hand, not a metal spoon, unless you know for certain it is pure stainless steel with no other metals.
Step 10: Refrigerate Kimchi.
Once the kimchi tastes done to you, move the jar to the refrigerator for storage. It’s best served cold. Enjoy your fresh kimchi with your favorite Korean cuisine – or all on its own!

Tips for Making Homemade Kimchi
Answers to all of your questions about making my easy recipe for kimchi in your kitchen, including tips and substitution ideas.
What does kimchi taste like?
If you’ve had traditionally fermented sauerkraut, Kimchi tastes somewhat similar. Imagine combining that with spicy Korean flavors. It’s so good! You just have to try it.
One important thing to note is that because there’s so much salt in it, you’d expect it to have a salty taste, but it doesn’t. The first time I made it, I was worried about that too, but the taste of salt fades away during the fermentation process.
What is lacto-fermentation?
Kimchi is made through a process called lacto-fermentation, which is a traditional method for preserving foods (primarily vegetables). It’s also used to make real sauerkraut and other cultured recipes like Spicy Carrots, Homemade Sour Cream and Fermented Orange Juice.
All you need to make lacto-fermented foods like Kimchi is the right balance of veggies, salt and water (and any spices you may want to add). Salt is a very important ingredient because it helps to inhibit the growth of harmful bacteria and allows healthy bacteria (Lactobacillus or lactic acid bacteria) to grow. The sugar helps this process along too.
Would you like to save this?
You can also add a vegetable starter culture to boost your ferment, but it’s not always necessary. Cultures for Health is my favorite place for fermentation supplies – they have an awesome Fermented Veggie Starter Kit if you plan to make fermented foods regularly.
By the way, the “lacto” in lacto-fermentation does not mean it’s dairy-based. Lacto is referring to lactobacillus (the bacteria) not lactose (the sugar in milk).
Why is there so much variation in fermentation time?
Like other cultured foods, Napa cabbage kimchi ferments at a pace that varies on a lot of factors like temperature, humidity, etc. Kimchi is one lacto-fermented food that can be made in areas with cooler temps as the ideal temperature for making kimchi is 68° F.
If you’re used to making fermented foods that need warmer temperatures like Kombucha Tea, you’ll need to remember to check your kimchi more often. I check mine 2-3 times a day. As soon as the flavors start to meld and it’s bubbling well, I transfer it to the fridge.
It’ll continue to ripen slowly in the fridge so it’s better to put it in the fridge too soon than too late. If you refrigerate it and realize it needs more time to ripen on the counter, just take it out and give it more time.
On the other hand, if you let it go too long on the counter, it can develop a sour flavor that you can’t reverse. It’s usually okay to eat over-fermented kimchi, but most people prefer to cook it at that point.
How to make a big batch?
If you want to make a big batch of kimchi, using two or more heads of Napa Cabbage, just increase the other ingredients by that same quantity to scale up how much kimchi you’re making.
And, instead of packing it into individual jars to ferment, you can leave everything in a big mixing bowl sealed tightly with plastic wrap. One good thing about using this method is that you don’t have to worry about the jars bubbling over onto your counter as they ferment (as long as you don’t overfill the bowl).
It’s important to choose a bowl made from a non-reactive material like glass, ceramic, pure stainless steel or certain high-quality plastics. You don’t want anything that will leach into your ferment. Also, make sure you keep it out of direct sunlight while it’s fermenting.
Then, once it’s done fermenting, you can transfer it into airtight jars to store in the refrigerator. It’s a little bit less work and less mess with this method.
What if there’s not enough brine?
There are two times during this process when you might need more brine. The first is when you’re initially making the kimchi.
Let’s say you forgot to reserve the liquid during the preparation process and you don’t have enough brine to keep the kimchi submerged. You can make your own brine by dissolving 3 tablespoons of sea salt in one quart of filtered water (room temperature, not hot).
The second instance where you may experience not enough brine is during the actual fermentation process. When the kimchi is fermenting, the pressure that builds up inside the jar can sometimes cause some or all of the brine to leak (or explode) out.
If you’re using the method where you put the jars into a baking dish (instead of on a towel), you can collect the overflow and pour that back into the jar as long as it hasn’t been sitting out for too long or become contaminated.
If you’re using a towel or the brine has been sitting out for too long, you’ll want to make a less salty brine than if it’s day one. Adding a super-salty brine to kimchi that has already been fermenting for a couple of days will leave you with really salty-tasting kimchi… not what you want.
You don’t want to add plain water either or you won’t get the benefit of the salt inhibiting bad bacteria from growing. To make a less salty brine to use after the fermentation process has already begun, dissolve 1 teaspoon of salt per cup of water that you need to top off your jars.
How to make whole cabbage kimchi?
Did you know there are more than 200 different types of kimchi served in various regions of Korea? Some are vegan and some use salted shrimp or squid. Others add chopped carrots. Some use sweet rice flour in the paste. Some use sugar while others are against its use. There is so much variation.
Another popular version of kimchi is called whole cabbage kimchi or Pogi Kimchi. In this version, you basically quarter or halve your Napa Cabbage then ferment whole leaves by rubbing the paste in between them instead of chopping them up.
You can use the same Gochugaru paste recipe to make it or, if you prefer, Maangchi has a traditional whole cabbage kimchi recipe that’s easy to follow.
Can kimchi be made with regular cabbage?
Yes, you can make kimchi with regular green cabbage, like what I make my Asian Slaw with if you don’t have access to Napa cabbage. There’s a version of kimchi called Yangbaechu that’s specifically made with green cabbage. It’s supposed to have a really nice crunch to it.
Best ways to eat kimchi?
You can eat kimchi as a snack, condiment or side dish. We typically eat ours raw with meals, but it can also be served cooked in many traditional kimchi recipes.
In fact, cooking is the best way to consume over-fermented kimchi and even kimchi that’s too salty (since you can dilute the strong flavors by adding other ingredients to the pan).
Here are some of the best recipes for a traditional Korean meal using Kimchi:
How to adjust the spiciness?
The recipe above calls for 3 tablespoons of Gochugaru, which will give you an authentic spicy kimchi flavor. If you don’t have a high heat tolerance, you can adjust the spicy level using these amounts as a guide:
- Mild: 1 tablespoon
- Medium: 2 tablespoons
- Spicy: 3 tablespoons
- Extra spicy: ¼ cup
I find that as the kimchi goes through the fermentation process, the spice level mellows out a bit as well.
However, if you do not enjoy spicy foods, there is yet another type of kimchi called White Kimchi (or Baek Kimchi). It does not use Gochugaru and is much milder in flavor.
Substitute for Gochugaru?
I’ve been asked if kimchi can be made from gochujang instead of Gochugaru, and the answer to that is yes. Gochujang is a chili paste that’s typically made from red chili pepper flakes, glutinous rice, fermented soybeans and salt. Since it already has added salt, omit the fish sauce and be aware the end result will be saltier than making your own Gochugaru paste.
In addition to Gochujang, some stores also carry ready-made Kimchi paste without added salt in the Asian foods section. Some people like it because it cuts down on how much time you spend making kimchi.
In addition, some people use crushed red hot pepper flakes like what I put in my homemade Italian seasoning. I have never done this myself, but from my understanding, they don’t have the same flavor profile and are much spicier than Korean chili flakes.
If you want to try substituting them, use less than the recipe calls for in your first batch; then you can experiment from there. It’s not hard to find Gochugaru these days so it’s worth the wait if you have to order it online.
Where to get Korean Gochugaru Pepper?
Gochugaru is Korean chili powder that you can get at most Asian markets and even many normal grocery stores (in the spice section.) As far as buying it online, Cultures for Health carries it if you don’t have a Korean grocery market in your area.
How to make vegan kimchi?
If you’re looking for a vegan kimchi recipe, try substituting soy sauce for fish sauce. The flavor won’t be quite the same, but it’s still really good! Kelp powder or miso paste can also give some umami flavor in the place of fish sauce.
If you want to take some extra time to get a more similar flavor, you can also make your own vegan fish sauce.
Is it okay to use a different type of salt?
Yes, if you don’t have sea salt, you can use kosher salt or any table salt in its place. Just make sure it’s not iodized or fluoridated as that may inhibit the fermentation process. Another popular type of salt is Korean coarse salt, which you can find at most Korean grocery stores.
How to store kimchi?
Even though Kimchi is fermented at room temperature, it needs to be stored in the fridge in an airtight container. Left at room temperature, it’s only good for a week.
Kimchi will typically last for about 3 months when stored in an airtight container in a properly cooled refrigerator. It may last more than 3 months in a fridge that’s very cold (near freezing temperature).
Since kimchi continues to ripen in the fridge, it will become more sour over time. You can usually still eat sour kimchi, but most people prefer to cook it due to the more pungent flavor.
Where to buy kimchi?
Since traditional kimchi is a fermented food, it needs to be refrigerated. If your local grocery store carries it, you’ll usually find it in the refrigerated section with other condiments like hummus and guacamole. If you find it on the shelf, it’s pickled, not fermented, and you won’t get the same benefits from it.
Sometimes Misfits Market has real fermented foods including good kimchi. If you don’t have a (free) membership yet, sign up to see what’s available in your area for delivery this week.

Easy Kimchi Recipe
Ingredients
Kimchi Ingredients
- 1 head Napa cabbage
- ¼ cup sea salt
- Filtered water
- ½ pound daikon radish - peeled and sliced into thin matchsticks
- 6 green onions - sliced in half lengthwise, then into ½-inch pieces
Chili Paste Ingredients
- 3 tablespoon garlic - minced
- 1 tablespoon ginger - grated
- 1 teaspoon granulated sugar
- ¼ cup filtered water
- 1 tablespoon fish sauce
- 3 tablespoons Korean Gochugaru Red Pepper Flakes - or more or less to your taste
Equipment
- Knife
- Cutting Board
- Large bowl
- Small bowl
- Spoon or whisk
- Plates or other weights
- Gloves
- Measuring cups and spoons
- Mason jars
Instructions
- Quarter your Napa cabbage lengthwise, then remove the core. Slice each quarter into strips or bite-sized pieces. Place the chopped Napa cabbage leaves into a large bowl.
- Sprinkle salt over the chopped cabbage, then massage it until it begins to soften and break down.
- Once it softens, add just enough filtered water to cover the cabbage. Use a plate or something similar to weight down the cabbage under the water.Let the Napa cabbage soak in the salt water for about 6 hours, then pour the cabbage into a fine mesh strainer set over a large mixing bowl. Let all of the excess water drain out of the cabbage into the bowl. Reserve the liquid.
- In a small bowl, combine ginger, garlic, sugar, fish sauce, ¼ cup of filtered water and Gochugaru pepper. Stir until a chile paste forms. You can leave the garlic a bit chunkier like we like it, or you can make a smooth paste by running it through a food processor.
- Transfer the drained cabbage to a large mixing bowl. Add the Daikon radish, green onions and your Kimchi paste.
- Wearing food prep gloves to protect your hands from the Korean pepper, massage the Kimchi sauce into the vegetables until everything is evenly coated.
- Pack the coated cabbage mixture into mason jars, pressing it down to make sure it’s covered by brine. If there isn’t enough brine in the jar, use the salt water you saved from draining the cabbage to fill it up. Leave about an inch of headspace (it will expand a lot as it starts to ferment) and lightly seal your mason jar with a lid and ring.
- Place your jars on top of a towel or in a baking pan (to catch any brine that escapes from the jars) and let them sit for 2-6 days at room temperature out of direct sunlight. Once you start to see bubbling in the mason jar, that means it’s fermenting. Open the jar to release excess pressure and taste your kimchi. If it tastes done, you’ll transfer to the refrigerator. If not, you’ll allow it to ferment for longer. When you close the jar, be sure to press the kimchi back down under the brine.
- Once the kimchi tastes done to you, move the jar to the refrigerator for storage. Enjoy your kimchi with your favorite Korean food recipes.


Is there any way to make this without the fish sauce? I really detest the taste of fish sauce in anything but I do want to start eating more fermented foods and the rest of the ingredients sound good?
Hi Lisa, if you look at the tip for making this kimchi recipe vegan, you’ll note that you can substitute soy sauce for fish sauce. The taste will be slightly different, but it still works.
I made the recipe , it made a lot! Good, maybe. How long will it last in refrigerator?
Thank you for recipe, I’m looking forward to the finished product
Cyndy L