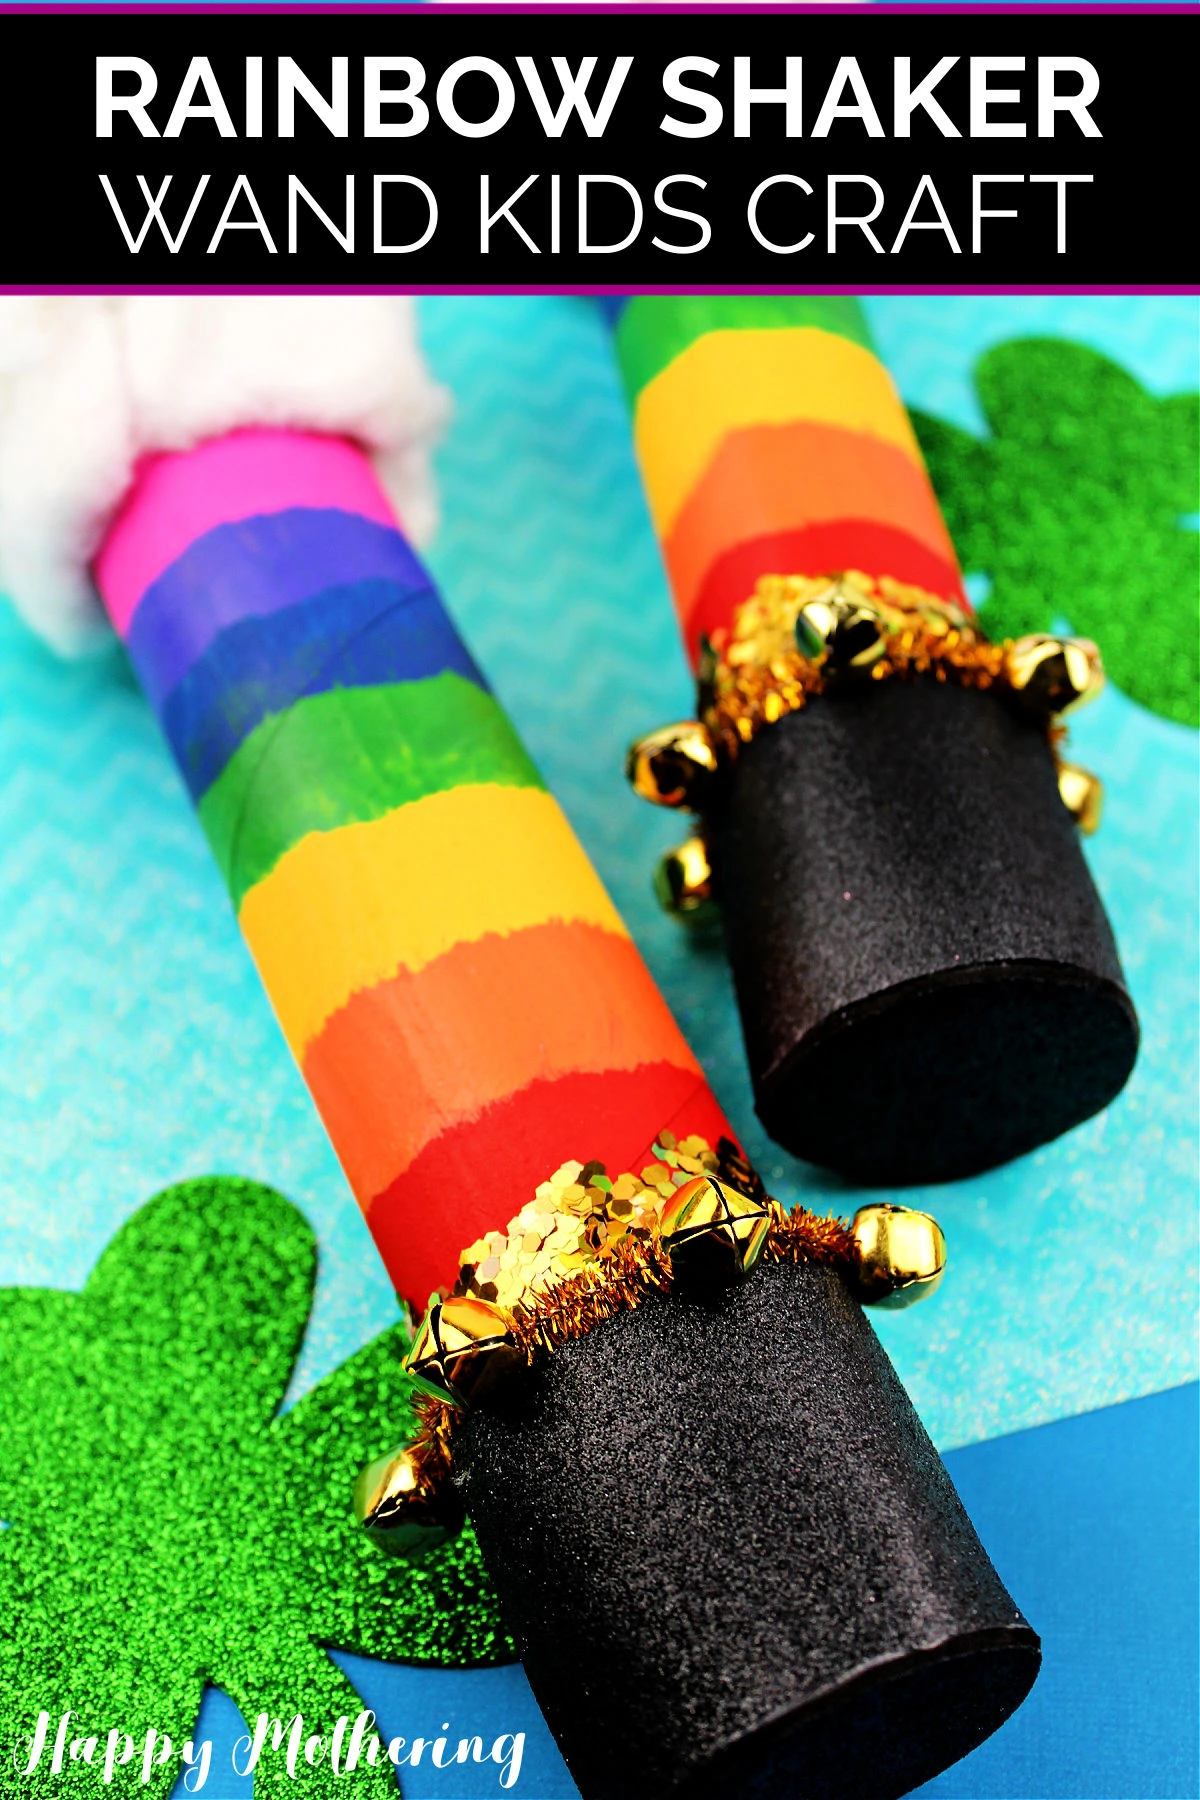
Rainbow Shaker Wand St. Patrick’s Day Kids Craft
Jump to Directions

Making Rainbow Shaker Wands is a fun St. Patrick’s Day Craft for kids of all ages. This simple craft uses basic supplies to make Rainbow Shakers that your little leprechauns will have a blast with.
If you’re planning out your St. Patrick’s Day activities and you have little kids, you’re probably looking for an easy craft for little hands. They will have so much fun making Rainbow Shaker Wands!
Not only are they fun to make, but the process is great way to help kids work on fine motor skills through cutting, gluing and painting.
This cute craft can be made at home or in the classroom. One really great thing about making these Rainbow Wands in groups is seeing how they each turned out… they’re all unique!
And it’s a fun craft to play with when they’re done. The sound of the rice shaking inside the toilet paper tube makes almost a rain-like sound. I find kids enjoy playing with them for hours.
Supplies and Tools
- Paper Towel Tubes
- Craft Paint
- Craft Glue
- Foil
- Rice
- Black Glitter Foam
- Gold Bells
- Gold Pipe Cleaners
- Cotton Balls
- Chunky Gold Glitter
- Scissors
- Paintbrush
- Masking Tape
Step-by-Step: How to Make Rainbow Shaker Wands
Follow these simple steps to make your own cute rainbow shaker craft for St. Patty’s Day.
Step 1: Cut and Glue Foil To Tubes.
Cut squares of foil large enough to wrap around the end of the paper towel tube. You want to make the foil about 3-4 layers thick. Glue the foil in place and then secure it by wrapping masking tape around the end of the tube.

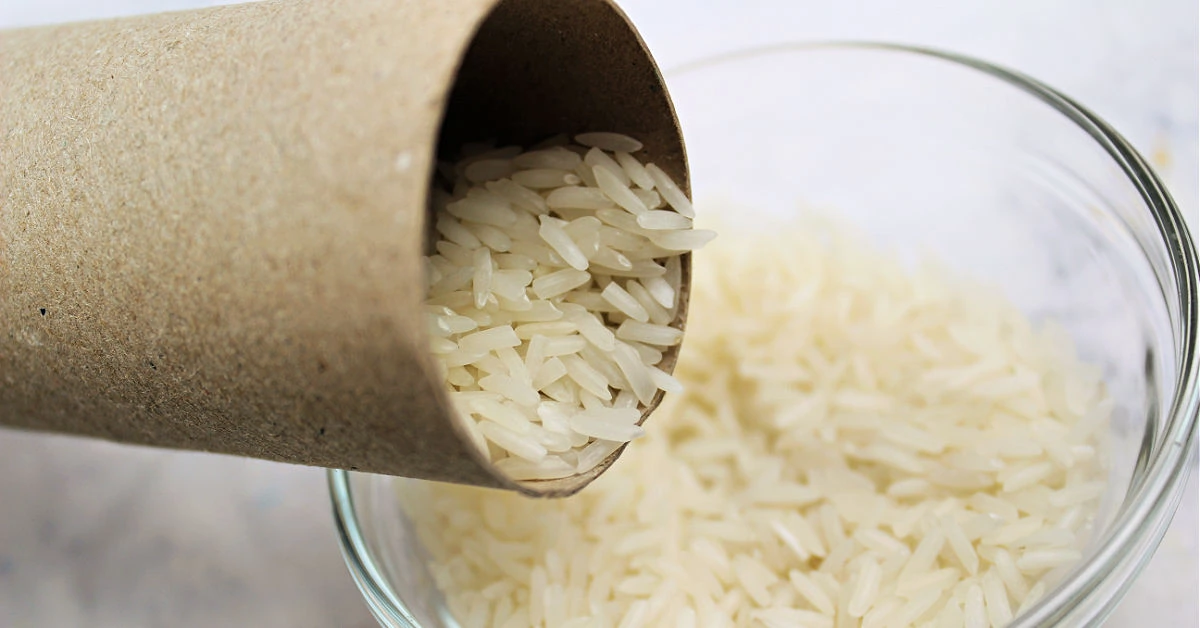
Step 2: Add Rice to Tube.
Measure 2-3 tablespoons of rice and add it to the inside of your paper towel tube.
Step 3: Seal Tube.
Seal the other end of the tube with foil and masking tape, just like in step 1.

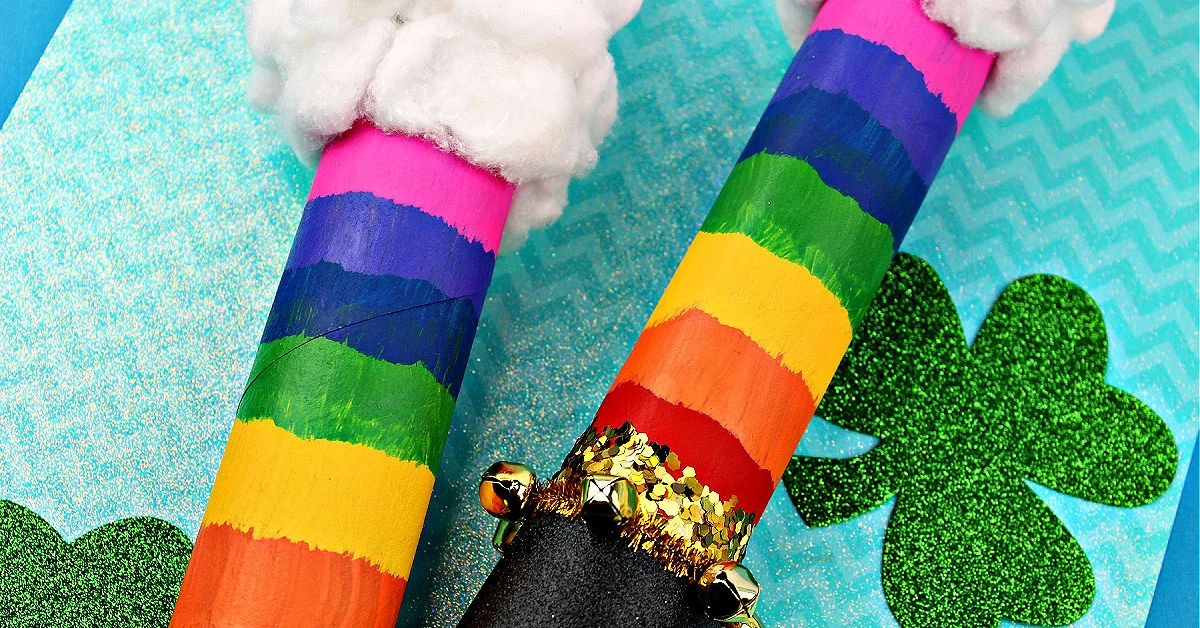
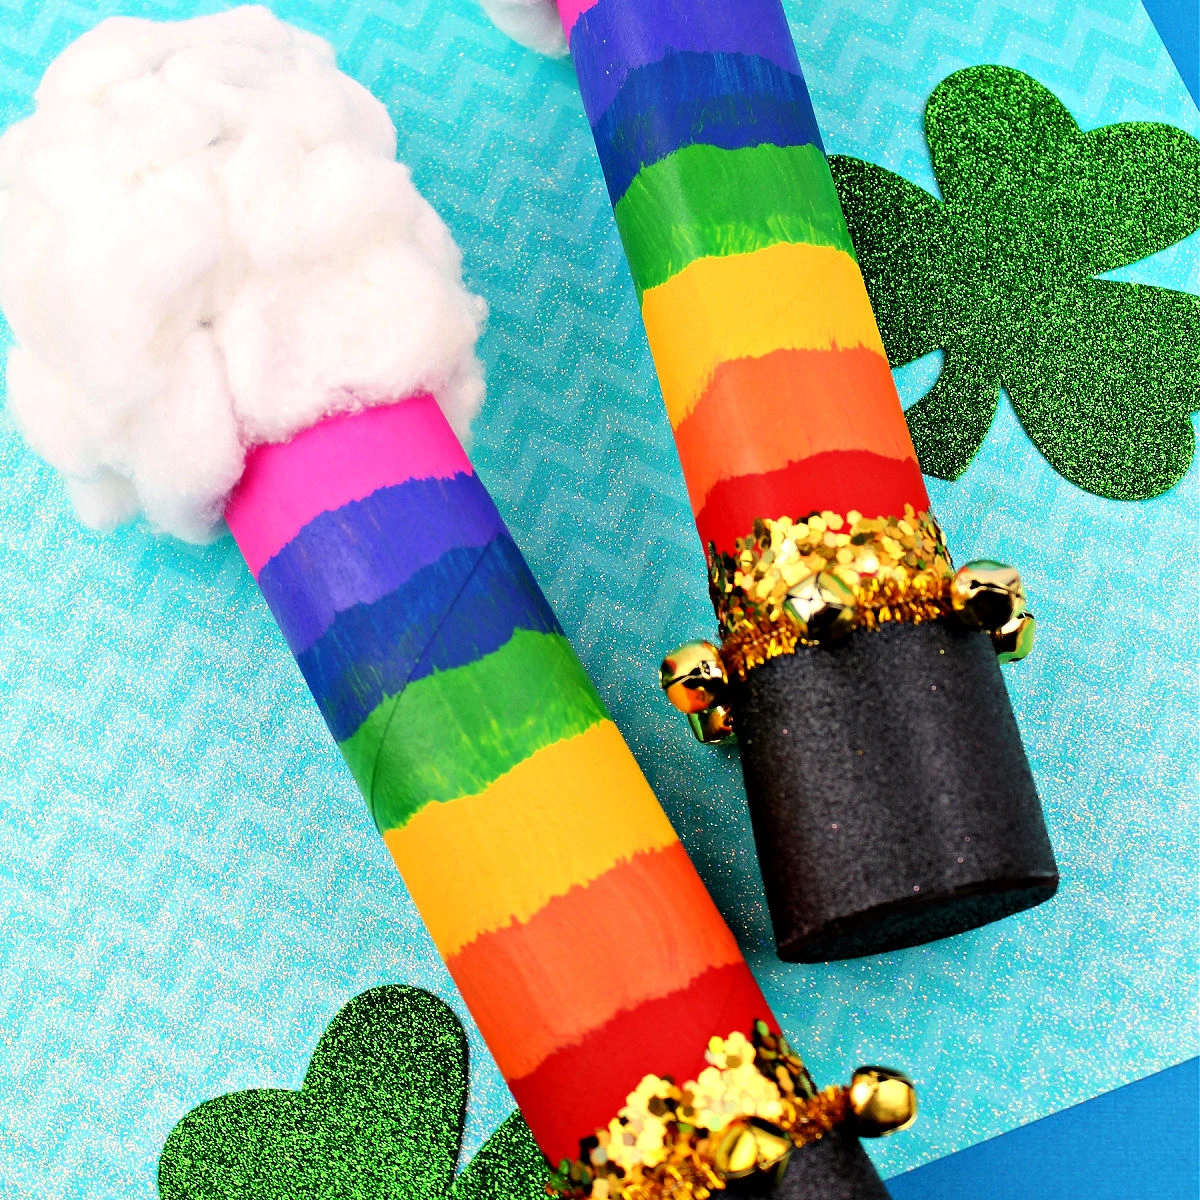
Step 4: Cover Tube Ends with Black Foam.
Cut one strip of black glitter foam that is the right size to be wrapped around the end of the paper towel tube. Glue the black glitter foam in place. Next, cut a circle that’s the right size to cover the end of the paper towel tube, then glue it in place.

Step 5: Paint Rainbow Colors on Tube.
Next, use a paintbrush to paint a rainbow pattern towards the other end of the tube, following the order of the colors of the rainbow: Red, Orange, Yellow, Green, Blue, Purple, Indigo (or in this case, pink).

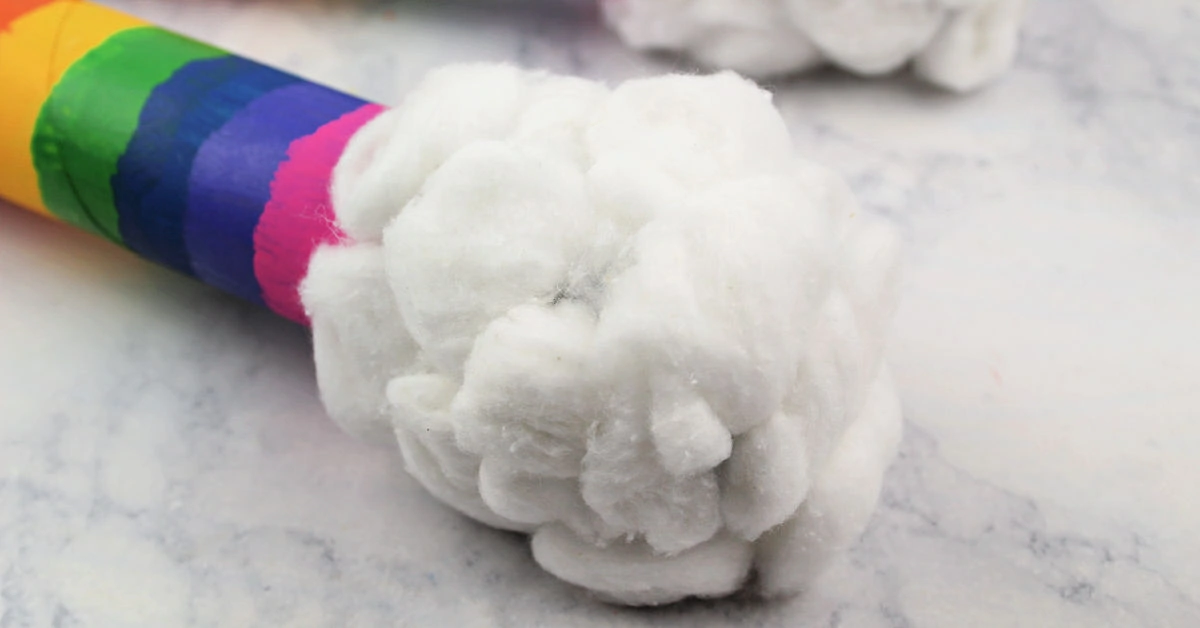
Step 6: Create Cloud Ends with Cotton Balls.
Once the paint is completely dry, it’s time to glue cotton balls onto the end of the tube to look like clouds at the end of a rainbow. Rip the cotton balls apart a bit and fluff them up so they look more like clouds and less like cotton balls.
Would you like to save this?
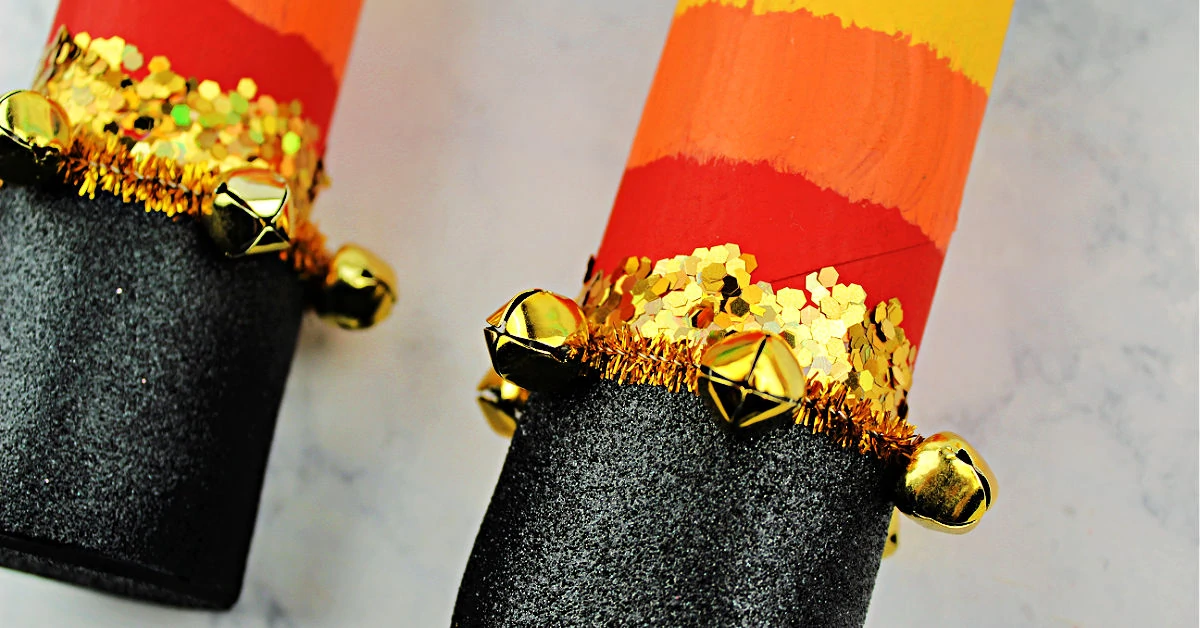
Step 7: Add Gold Glitter.
Place some glue all the way around the tube just above the black glitter foam. Sprinkle your gold glitter all over the glue and allow the glue to dry completely (I like how chunky glitter looks a lot like gold coins).

Step 8: Add Gold Bells.
Finally, string several gold bells onto a golden pipe cleaner. Wrap the pipe cleaner around the painted tube and glue in place at the top of the piece of black glitter foam.
Step 9: Play with Rainbow Shaker Wand.
Once everything is dry your colorful Rainbow Shaker Wand is complete and ready to play with.
Tips for Making Rainbow Shakers
Answers to all of your questions about making this cute rainbow kids craft on St. Patrick’s Day or any time of year.
1. How to make rainbow shakers in the classroom.
If you plan to make this craft with your kid’s classroom where there will be different skill levels, here are some tips to make it go smoother with younger children.
- Have everything premeasured, cut and put into “kits” for each student so you know you have the right number of materials.
- Fluff up the cotton balls before putting them in the kits.
- If paint is too messy, you can also have them glue on strips of colorful construction paper to make the rainbow instead of painting the stripes. Pre-cut rainbow strips to the appropriate size.
- Make sure to have extra supplies in case someone makes a mistake and needs a replacement item.
2. Explore sound with sensory play.
While we used rice to fill our shakers, it’s not the only option. Consider using colorful beads (to stick with the rainbow theme) or another material instead of rice. Or make several with different items inside and compare the different sounds they make.
And if you want to extend the sensory experience with touch as well, try making Rainbow Cloud Dough. Kids love how it feels squishing in their hands and you only need 2 ingredients to make it.
3. St. Patrick’s Day craft ideas for older kids?
If you want an easy craft older kids can help with, try my St. Patrick’s Day Shamrock Candle Craft. It uses dollar store supplies, can be made in minutes and makes great holiday themed home décor.
4. More ways to use cardboard tubes.
I have toilet paper tubes and paper towel tubes coming out of my ears. We go through so many since we work from home and homeschool, so I’m always looking for practical ways to use them.
Here are some other festive crafts that can be customized for St. Patrick’s Day too:
DIY Rainbow Shaker Wand Kids Craft
Supplies
- Paper Towel Roll Tubes
- Craft Paint - in colors of the rainbow
- Craft Glue
- Foil
- Rice
- Black Glitter Foam
- Gold Bells
- Gold Pipe Cleaners
- Cotton Balls
- Chunky Gold Glitter
Tools
- Scissors
- Paintbrush
- Masking Tape
Instructions
- Cut foil squares to wrap around the paper towel tube ends. You want 3-4 layers on each side. Glue foil squares to one end, then secure with masking tape.
- Add 2-3 tablespoons of rice to tube.
- Seal the end of tube with foil and tape as in step 1.
- Cut a piece of black glitter foam long enough to wrap around the end of the tube and glue in place. Cut a circle large enough to cover the end of the tube and glue in place.
- Paint rainbow colors on the other end of the paper towel tube.
- After the paint dries, glue ripped and fluffed up cotton balls onto the end of the tube.
- Add glue above the black glitter foam around the tube. Sprinkle gold glitter onto the glue then allow the glue to dry.
- String gold bells onto a gold pipe cleaner. Wrap the pipe cleaner around the tube and glue in place towards the top of the black glitter foam piece.
- Your Rainbow Shaker Wand is finished. Enjoy your easy peasy St. Paddy’s Day kids craft.
Thank you for this tutorial!!! I’m going to get the supplies for my daughters classroom so the whole class can make these. Very cute idea!!!
You’re welcome! I hope your daughter’s class has a blast making rainbow shaker wands for St. Patty’s Day!