How to Tie Dye Socks
Jump to Directions
Discover the fun and creativity of transforming plain socks into vibrant, wearable art with this comprehensive guide on how to tie-dye socks at home. Starting from setting up your workspace to washing and drying your finished creations, this easy-to-follow tutorial offers a unique and engaging DIY project for you to try.

Tie-dying is a fun and easy way to add some color and personality to your socks. It’s a great way to give new life to an old pair of socks or make a unique gift for a friend. With a few simple supplies and a little bit of creativity, you can create a one-of-a-kind pair of tie-dyed socks.
Start by picking up a tie-dye kit – Tulip One-Step kits are a popular choice – and a pair of cotton socks. Along with some household items like rubber bands and plastic bags, you’ll be well-equipped to start your adventure of learning how to tie-dye socks.
With these easy steps, you will create a unique and colorful pair of socks. Experiment with different folding techniques and color combinations to create a variety of designs. Tie-dying is a fun and easy way to add a personal touch to your wardrobe and make a fun homemade gift.
Supplies you’ll need to tie-dye socks

- White cotton socks: It’s best to use socks that are made of at least 70% cotton for optimal color absorption.
- Tie-Dye kit: You can find these online or at a craft store. They usually include a variety of dye colors, squeeze bottles, and sometimes even gloves and rubber bands.
- Rubber bands: You’ll need these to create the tie-dye patterns. If they’re not included in your kit, you can purchase them separately.
- Plastic squeeze bottles: These are usually included in the kit. If not, you’ll need these to apply the dye.
- Plastic bags: These will keep your socks moist while the dye is setting.
- Plastic table cover: This is optional but useful to keep your work surface clean.
- Disposable gloves: To protect your hands from the dye.
- Water and a sink or a bucket: You’ll need water to activate your dye and rinse your socks.
Step-by-Step: How to Tie Dye Socks
Follow these simple step-by-step instructions to learn how to tie dye socks. Remember, tie-dyeing is a creative process, so feel free to experiment with different tying techniques and color combinations to create your own unique designs. Enjoy your tie-dyeing project!
Step 1: Prep Your Work Area
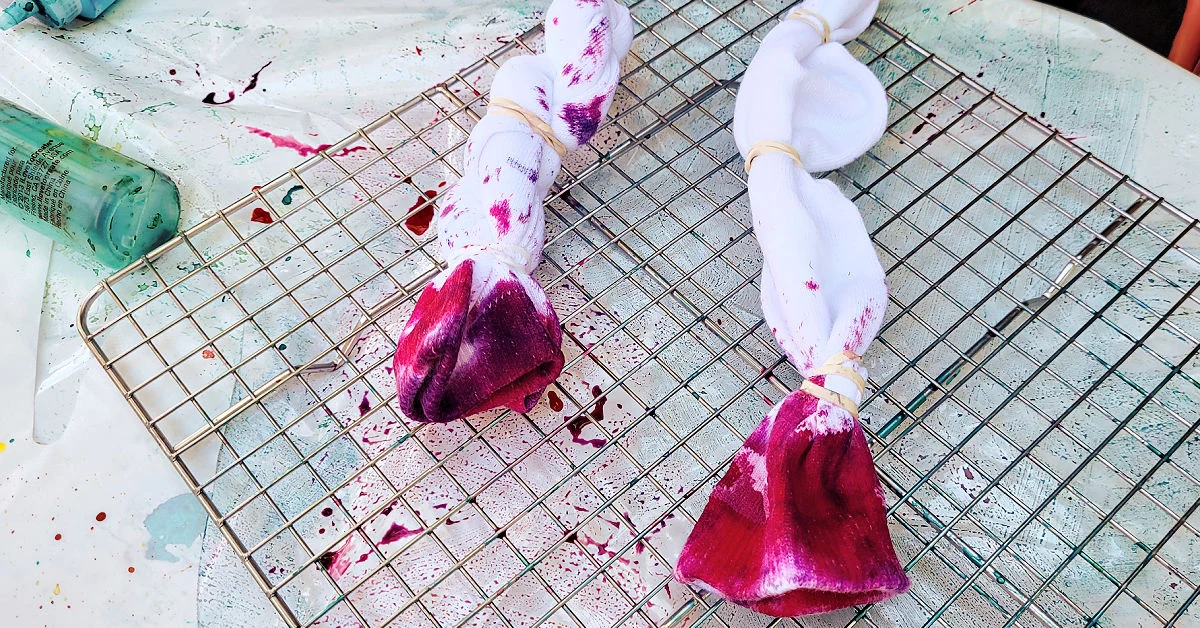
Start by covering your work area with a plastic table cover or garbage bags to protect it from staining. I also like to use a wire rack to raise the socks up off of the surface. Make sure to wear old clothes as the dye can splash.

Step 2: Prepare the Socks
Wet the socks with water and squeeze out the excess. This will help the dye absorb better.
Step 3: Tie the Socks
Twist, fold, or scrunch your socks, then secure the folds tightly with rubber bands. The pattern of the dye will depend on how you tie your socks.
Step 4: Prepare and Apply the Dye
If using a tie-dye kit, follow the instructions to mix the dye. Typically, you’ll just need to add water to the dye powder in the squeeze bottles.
Wearing your gloves, apply the dye to the socks. You can use one color or multiple colors, depending on your desired look. Make sure to saturate all areas, including the folds.

Step 5: Let the Dye Set
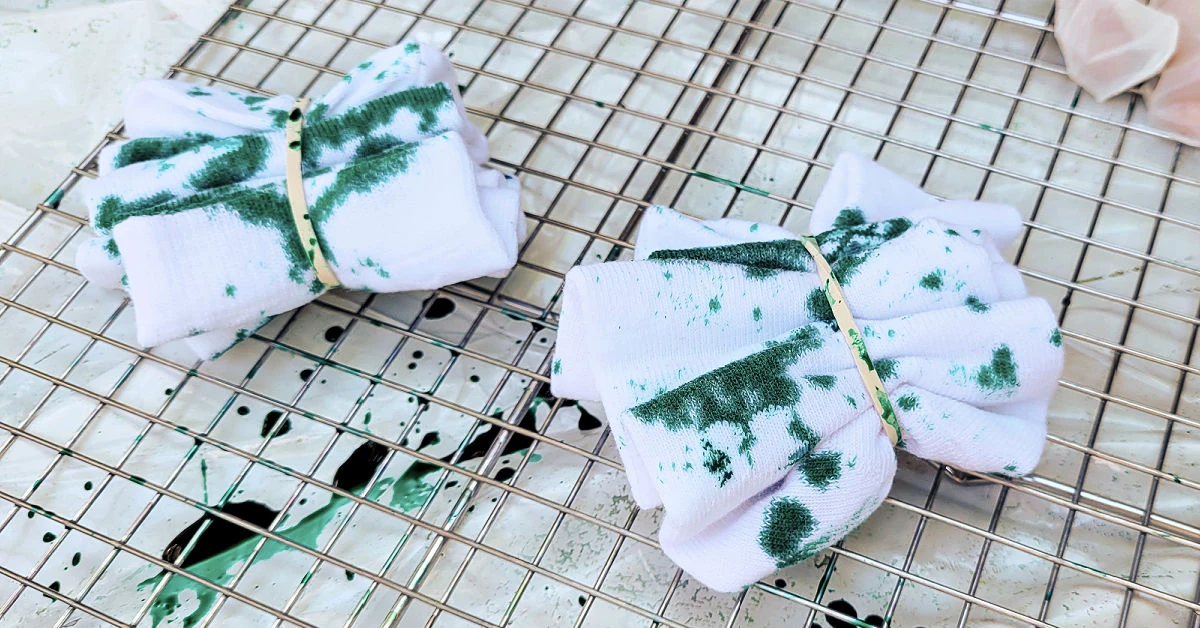
Once the dye is applied, place each sock in a separate plastic bag, seal it, and let it sit for 6-8 hours or overnight. This will allow the dye to set.
If you place them all in one bag, like pictured here, be careful not to move the bag around or let the socks touch or the colors will bleed between socks.

Step 6: Rinse Excess Dye
After the dye has set, remove the socks from the bag and rinse them under cold water while they are still tied, until the water runs clear. Then, remove the rubber bands and rinse again if needed.
Would you like to save this?

Step 7: Wash and Dry
Finally, wash your socks in a washing machine on a cold cycle, then dry them as usual. For the first few washes, wash the tie-dyed socks separately to avoid staining other clothes.

Step 8: Wear Tie Dye Socks
Now your socks are ready to wear. Aren’t these socks fun?

Tips for Tye Dying Socks
- Always prewash socks: To ensure the best dye absorption, always prewash your socks in hot water with a mild detergent before you start the dyeing process.
- Use cotton socks for brightest colors: Cotton socks or a polyester blend with a high percentage of cotton are the best material for achieving bright colors.
- Protect your workspace: Cover your work surface with plastic wrap or a plastic table cover to minimize the tie dye mess.
- Use a squirt bottle: For precise dye application, use plastic squeeze bottles and apply the dye with the tip of the bottle.
- Manage your whites: For more white spaces or white spots in your final design, apply less dye or leave certain sections of your socks untouched by dye.
- Soda ash solution: A cup of soda ash can help to increase the pH level of the surface of the socks, allowing for better dye absorption and brighter final results. However, this is optional and not included in all kits. I’ve never needed to use it with the Tulip one step dyes.

Substitution Ideas
- If you don’t have a tie-dye kit, you can create a reactive dye using fabric dye and soda ash solution.
- In absence of rubber bands, you can use string to tie your socks for different patterns.
- If plastic squeeze bottles aren’t available, you can use any small, clean squirt bottles, like an old, thoroughly washed ketchup bottle or even a spray bottle.
- If you can’t find white cotton socks, an old pair of socks made from natural fibers will also work. It’s one of many things to do with old socks.
- If you don’t have plastic bags for the dye setting process, you can wrap your socks in plastic wrap or place them in a covered plastic tote.
Frequently Asked Questions
Here are the answers to some common questions I get about tie-dyeing socks.
Can I use synthetic materials?
For best results, it’s recommended to use natural fibers like cotton because synthetic fibers may not absorb the dye well.
What is the best way to wash my tie-dyed socks?
It’s recommended to wash your socks in cold water in the washing machine. For the first few washes, wash the tie-dyed socks separately to avoid staining other clothes.
Where did those cool patterns come from?
Tulip has a really cool kit for tye-dying socks called the Crazy Socks Kit. It includes all of these patterns and can be bought from Amazon or Blick Art Materials (their price is usually better).

What if I don’t have a Tulip One-Step dye kit?
Other types of dyes can also be used for tie-dyeing socks. However, the instructions for use and results might be different.
What should I do if I don’t like the end result?
Tie-dyeing is a creative process, and the results might not always be as expected. If you’re not happy with your finished product, you can try different styles and patterns in your next attempt. There are a few different styles in my post on how to Tie Dye Shirts.
Can I tie-dye black socks?
Lighter colors work best for tie-dyeing, but if you use bright or neon dyes on black socks, you can still get interesting, unique socks with trippy prints. A better way to tie-dye black socks, though, is to use a Reverse Tie Dye technique where you remove some of the black coloring and replace it with the colors of your choice.

How to Tie Dye Socks
Supplies
- White cotton socks
- Tie-dye kit
- Rubber bands
- Plastic squeeze bottles
- Plastic bags
- Plastic table cover
- Disposable gloves
Tools
- Water and a sink, or a bucket
- Washing machine
Instructions
- Cover your work area with a plastic table cover or garbage bags to protect it. Be sure to also wear old clothes.
- Wet the socks and squeeze excess to help the dye absorb better.
- Twist, fold, or scrunch your socks, then secure the folds tightly with rubber bands. The pattern depends on how you tie your socks.
- Follow the kit’s instructions to mix the dye. Apply it to the socks while wearing gloves. Use as many colors as you like, being sure you saturate everything, including the folds.
- Place each sock in a separate plastic bag, seal it and let it sit for 6-8 hours or overnight to let the dye set.
- Remove the socks from the bag and rinse under cold water while still tied, until the water runs clear. Remove the bands and rinse again.
- Wash your socks in a washing machine on a cold cycle, then dry as usual. For the first few washes, wash the tie-dyed socks separately to avoid staining other clothes.
- Now your socks are ready to wear.